Producing a School Sporting Event
The production of high school sporting events generates a high degree of interest among
student production crews. The production of these events can be as simple as a
single camera to a multi camera production with a full range of special effects.
Single camera productions
Single camera productions provide an interesting training opportunity for student
videographers and announcers. This limited crew must solve all the technical and
production problems. Particularly if covering an event at another school where they must
make arrangements in advance, locate a convenient parking spot, quickly scout the
location, find a location in the stands and locate an electrical outlet.
Basic Equipment
Such a production can be done with the simplest of equipment if it is done correctly.
One obviously needs a camcorder with a microphone jack. In addition, power
cords long enough to reach from an electrical outlet to the stands. Due to the length of
most games, an external power supply is a necessity. For events that are likely to
run more than an hour, an external digital recorder such as a FireStore is a handy device
to have.
A steady tripod with a smoothly operating pan head is critical for any video
production. A cheep camera on a good tripod will look better than a good camera on a
cheep tripod. Tripods designed for still photography are not designed to smooth
panning and tilting.
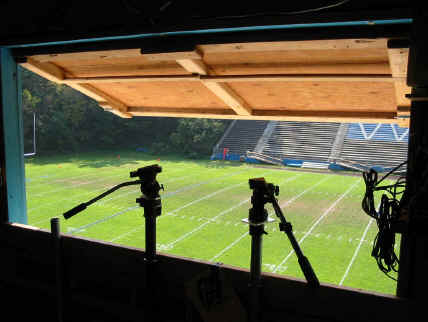
In many broadcast booths, it is difficult to locate a tripod so that the camera can pan
the field of play. You can save time and effort by installing a post that will
accept your tripod head. The
posts are electrical conduit pipe secured with a "U" bolt.
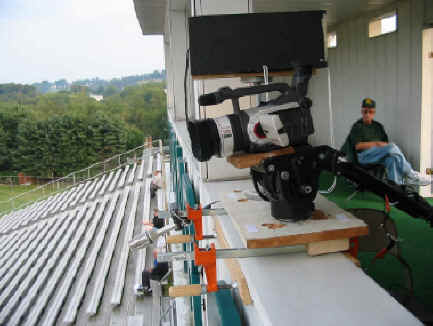
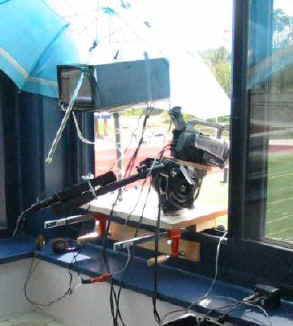
For "away" venues, we have mounted a board on two adjustable wood working clamps
(orange) and installed a pan head on the board. With this device, the camera can be
clamped to any window. This works particularly well in locations where there is only
a narrow window or a counter in front of the window. Note that there is also a video
monitor mounted on the base.
A DVD recorder is an option but they are know to fail so it is best to use two.
DV can be fed from the camera or the camera and an audio mixer can be fed to the
analog inputs. To manage the DVD recorder's menus, an external monitor is required.
Intros can be pre recorded on DV tape and added before the game begins. Since
most DVD players will only repeat "chapters", you can only use the PAUSE control
during the event. A player that can repeat all the TITLES on the disk can eliminate
this problem. To save disks do to technical glitches or human mistakes, DVD-RW disks
that can be reformatted are preferable. They also seem to be a little more reliable.
If more than one recorder is used, it is better to use an inexpensive Radio Shack
Distribution amplifier. (Never use an RCA "Y" adapter which will double
terminate the camera and lower the signal strength by 50%. You can "Y"
audio.) Looping the video through multiple devices decreases the quality.
Looping also runs the risk that a failure or accessing a menu on the first devise
will be captured by the second machine. A simple A/V switch will allow you to
monitor each device independently.
The camera must have an external microphone jack and some form of audio output.
Whenever one uses an external microphone, you have introduced a number of elements for
potential failure. The microphone, cables and connections can all fail. For this reason,
whenever an external microphone is uses, headphones must monitor the audio.
Many cameras provide a headphone jack that solves this problem. Others provide only an
RCA jack providing only a line level output that will not drive a set of headphones.
In this case, a small amplifier is required to drive the headphones. Radio Shack makes
a small audio amplifier that is ideal for such applications. An RCA male to
1/8" male adapter cable is required to connect the camera to the amplifier. Since the
announcer may be a distance from the camera, a cable with an 1/8" male plug one end
and a female jack compatible with your headphone at the other. A "Y" adapter
installed at the amplifier provides a second set of headphones for the camera operator.
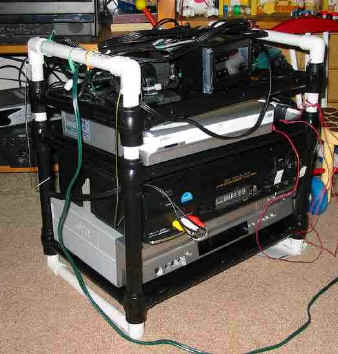
To save time wiring the DVD or VCR, audio mixer, monitors and electrical power
connections, construct a rack from a small adjustable shelving unit reinforced with
1/2" PVC tubing. Secure the "elbows" with self taping screws rather
than glue so the rack can be disassembled or modified. The shelves can slide up and
down on the PVC tubing so the equipment is well secured. The configuration
above shows two VCRs and a DVD recorder. The audio mixer, meters distribution
amplifier and output switch are on the top shelf.
Simple Production Values With a Simple System
With this equipment, the production team can produce a reasonably watchable program.
However, the camera operator must constantly zoom and pan from one center of interest to
another. It takes some time to master the technique but it can be done.
No viewer of a replayed game likes to wait though a timeout break. When there is
a break, the camera operator should stop the tape or pause the DVD and give the announcer
a chance to take a break. . To do this, the camera operator needs to communicate with the
announcer. This can be done with a simple IFB intercom system, hand signals or a slap on
the back.
Consider a break in the action where the camera operator decides to take a shot of the
scoreboard. This requires slowly panning the camera and zooming in on a well-composed shot
of the board. Then he must zoom back to the court. The above is time consuming and it is
difficult to execute smoothly. A better technique would be to pause the camera,
compose the scoreboard shot and restart the camera. At this point, the announcer should
make comments relative to the information on the scoreboard. When the announcer is
finished, the tape should again be paused, a shot of the court established, the tape is
restarted and the announcer cued. This is difficult to execute when the camera operator
and the announcer are operating independently. What is required is a better form of
communication between the technical crew and the announcers. Most video
cameras have a "photo" mode that takes a six second still image. The
camera operator can take a still shot of the scoreboard and then compose the next shot by
aiming the camera in the general direction by visually siting over the camera.
Announcers:
Announcers are one of the most critical elements of any sports
production
See: The Care and Feeding of School
Sports Announcers
Production Communications
All professional announcers are in constant communication with their production crews
via a system call "Interruptible Fold Back" or IFB for short. The
"fold back" is the announcer’s own audio which can be
"Interrupted" by the technical crew.
An IFB system requires three elements.
- A headphone/microphone head set for the camera operator or the director/producer.
- An amplifiers for the microphone similar to the one described above.
- A SPDT (Single Pole, Double Throw) switch.
The switch is wired so that in the normal position, the audio from the camera is fed to
the announcers. When the switch is thrown, the audio from the producer’s amp is
routed to the announcers. With this arrangement, the camera operator or the director can
cue the announcers when to pause or cue them to resume.
Multi-camera Productions
Using two cameras becomes considerably more complex.
Additional equipment that is required:
- Second camera and tripod.
- Video mixer similar to the Videonix MX 1 or MX Pro.
- Separate VCR or DVD recorders.
- Audio mixer since most VCRs do not have a microphone level input.
- Preview monitors for mixer .
- Preview monitors for individual cameras.
- Line monitor
- Cases to transport the above equipment.
- DVD-ROM recorder for replays.
- Character generator or laptop with PowerPoint and an SVGA to video scan converter.
The entire crew needs to be familiar with equipment so it can be set up quickly at the
remote venue. In many situations, it is simpler to set up the production equipment on a
table rather than in the stands. As noted above. It simplifies the setup
procedure to have the recorders, monitors and other production equipment prewired in their
one racks.
The cameras and announcers are usually remotely located from the production equipment
so cables must be constructed for:
- Power
- Two video cables for camera
- Video cable for a monitor for the announcers
- Announcer microphone lines
- IFB Line
- Camera Intercom Line
Such a cable should be about 150’ to 200’ in length depending on the venues
where it will be used. Old garden hose reels mounted on a wood base are great for
winding up cables. Never wrap cables around your arm! This introduces
twists not only in the wires that make up the cable but also the conductors with in the
wires. It is best to fold the wires in half and then in half again and then tie them
with a soft cord. Duct tape make a stick mess. Storing short cables in a
suite case saves tangles.
Cabling the Wires
Standard PVC sticky tape rarely works well and degrades rapidly. Self amalgamating tape is
a polyisobutylene tape which has no adhesive but over a period of hours adheres to itself
and forms a single amalgamated rubber molding conforming to the shape of the items it is
covering.. It does not adhere to the substrate so can be cut away with a sharp knife if
access is
required later. Once in place for more than about 30 minutes it cannot be unwrapped but
must be cut away. Once left for a few hours the tape bonds to itself to form a shaped
rubber molding resistant to water and most solvents. It remains stable over a wide
temperature range and degrades only very slowly (several years) in sunlight.
Wrapping Up a Cable
Short Video or Audio Cables - Fold in half
and half again.
Long Cables
Use a short releasable wide-profile cable tie to secure the mixer-end of the cable in a
circular loop about half a meter across (or less if it's a short cable). Then roll that
loop hand over hand winding up the cable ensuring that each turn of the loop does not
increase or decrease in size compared with the first. When it's wound up, use a
longer cable tie around the whole thing to fix it in place (maybe sometimes another cable
ties on the opposite side of the loop if necessary). Obviously unwinding involves the
reverse procedure. So it's like as if it were on a drum, but you don't have the additional
bulk and weight of a
drum to heave around.
Always coil cables the same way. This avoids kinks and tangles-and will increase the
service life. Coil clockwise because of the way the conductors spiral inside the cord set.
Others like to coil video and audio cables "over & under" like . That's
fine, too, just be consistent. If you fold a flexible audio cable or extension cord in
half several times, it will always bend in the same
place.
Remember to NEVER leave any power handling cable coiled when under electoral load! The
induction current can cause it to dangerously overheat. To keep it neat, "Figure
8" the excess cable in any run.
Permanent Installations
If you are going to do it more than once, then consider installing permanent cabling in
your gym, auditorium or football field. The time and effort expended in such an
installation will be repaid in the time saved in setting up for programs.
Jack boxes for the cameras and announcers can be constructed using PVC plastic
electrical boxes. These are available in single and double gangs depending on how many
jacks are required. These boxes have flat plastic covers that can be easily drilled for
the required jacks. Plastic is ideal sine it is best not to have video or audio lines
connected through to each other through a metal plate. Use a �" or �" spade
bit" to remove the unneeded posts used for installing electrical switches to make
more room for jacks. �" conduit pipe can accommodate several cables for the
announcers or a single camera. These boxes are also available for 1" conduit.
Route the conduit to jack boxes located in a room adjacent to the gym. However, all the
equipment still needs to be moved to and setup in this location. While you are at it,
consider running the cables from your remote facilities back to your studio. Route the
cables through the crawl spaces under the school or above a suspended ceiling using
students as free, no-union labor. RG-6 cable allows cameras to be located up to 600’
or more from the mixer. Once installed, setting up for a remote production is a simple as
moving the cameras and patching your studio production equipment to the remote lines.
Gym Installations
Rather than setting up in the stands, consider a platform to provide a convenient
location for your announcers and camera in the gymnasium. Use a 4X8 platform (steal one
from your stage sets!) Use several heavy-duty hinges to attach the back edge of the
platform to the gym wall with toggle bolts. Alternatively, attach them to the top bleacher
seat if they are solid enough to prevent bouncing when the crowd jumps to their feet.
Install two or three front legs so they fold down to support the front of the platform on
the bleachers. Use a lock hasp with the ring installed on the wall so the platform folds
up and locks in place when not in use.
Make provisions for installing an older camera as a scoreboard camera.
Crew Responsibilities For Producing a Multiple Camera Football Game
----------- THE DIRECTOR ----------
The director is the boss but must balance authority with a willingness to listen to
input from the other members of the crew.
Since this is a student production, he/she must be a teacher, not a boss, realizing
that members of the crew are in the process of learning the craft as is the director.
SHOT SELECTION
- Encourage cameras to think ahead and sell color shots.
- Use close up shots - wide shots give general idea of place but no detail.
- Field camera can not follow plays except if directly in front of camera.
- Field is boring between plays - use color shots.
- Use graphics of announcer’s and player’s names during game to help audience
identify with them.
- Technically different looking cameras make switches obvious.
- Constantly check video levels, white balance and focus
Things that REALLY annoy the viewing audience
- Viewers want to see the game! Color adds interest but should not detract.
- DON'T SWITCH CAMERAS DURING A PLAY
The play is over before viewer can find the ball on the screen after the switch.
- Keep taped pre-game introduction short (3:00) Wrap up fast 1:57 time is goal
- Pre-tape introduction if possible
- Pause tape during time outs, quarter breaks, halftime and after scores.
Your announcers need a break! Total for a football game should be
under 2 hours.
There is no need to and any extra time to a replay!
- Nor do they want to miss any action!
Person who pause VCR should not leave the machine until
restarted.
- Avoid JUMP CUTS - take a color shot before pausing tape.
- Don't use same shot over and over. i.e. the girl friend of the camera operator.
- Don't switch between almost identical shots.
- Don't get cameras too tight at beginning of plays - the defense and play setup are
important.
BEFORE THE GAME
- Check crew list.
- Practice with Camera operators for both halves.
- Check all microphones and sound sources.
- Check IFB and announcers audio.
- Coordinate Graphics - check names and INTRO. series.
- Confirm S-VHS tape in machines and labeled.
- Have field camera in position for coin toss.
- After Toss, move to had of "race way" for player intro.
- After Player intro., move off field fast.
- Make sure BAND TAPE is cued at end of last show!
DURING THE GAME
- Use camera closet to the play as PLAY camera.
- Color shots between each play.
- Make use of field camera - switch operators at quarter.
- Replay any gain or loss > 5 yards.
- Frequent use of relevant graphics.
- PAUSE tape for all breaks. Keep game under 1:55.
- Listen to the announcers.
- Work with camera operators who are having problems
- Patience!
HALF TIME
- Make sure BAND TAPE is cued in replay VCR
- Practice coverage on visitor's band.
- Position FIELD CAMERA at 35 yard line.
- Mix CROWD and FIELD MICROPHONE.
- Keep wide and pan SLOWLY when band is moving.
- Use as many quick color shots as possible (4-8 counts)
SECOND HALF
- Supervise orderly transition to new crew.
- Make sure you are ready to go before game starts!
AFTER GAME
Congratulate you crew!
Supervise removal of cameras from press box.
Rewind and replay tape back cured to end at o5: till hour
Replays on the hour
---------- TECHNICAL DIRECTOR ----------
The Technical Director has the responsible for caring out the technical commands for
the director. He is also responsible for technical quality of the program. Part of his job
is checking that the equipment is functioning properly. White balance, video levels and
focus are very important to the viewers. If the show is worth doing, it is worth doing
right! If the cameras are not aligned technically, viewers will not bother to watch no
matter how exciting the event. The TD can assist the director by previewing shots sold by
the camera operators.
BEFORE THE GAME
- Arrange for the setup of the cameras and run camera cables.
- Make sure cameras are on the "middle" AUTO GAIN position - even for night.
- Run field camera cable behind goal post in end zone.
- Run visiting teams field phones cable, set up booth headphones and check.
- Check video levels on the 'SCOPE'.
- Check color wheel and white balance on all cameras - will change every 5 minutes till
sun sets.
- Check headphones and correct tally light on each camera.
- Coordinate replay procedures with DIR and TAPE operators
DURING GAME
- Switch cameras as directed.
- Cover up the directors mistakes - "Don't do what he says - do what he means!"
- Preview obvious next shots, color and replays.
- Assume directorial duties if director is occupied.
- Watch focus and white balance.
- Be ready to punch out of replays.
AFTER GAME
- Help with removal of equipment from press box.
- Store Camera in safe place in studio or van.
- Disconnect field camera/microphone cable in studio and at camera
- Roll up field camera cable.
--------- AUDIO OPERATOR ----------
Sound is the most important production value. If all else fails, we can
still do a radio show!
The operator should listen to the announcers and watch the game to alert the crew for:
First downs, Player numbers, time remaining, kicks on 4th down. Show will sound
"dead" with out crowd noise but too much will override the announcers. PA system
overpowers crowd microphone in broadcast booth so rely on the microphone on the field
camera. However, listen for voices of people too close to the camera microphone. Sound
should match picture so bring up field camera microphone when it is on air. Use PA
announcer for pre-game and player intro.
BEFORE EVENT
- Set up microphones:
Announcer, crowd parabolic, microphone feed from on-field camera.
- Confirm that microphones are working.
- Check other sound sources: TAPE, PA SYSTEM, REPLAY VCR/DVD.
- Confer with PA announcer as to when to start tape for
- pre-game message and player announcements.
- Check intercom
systems to cameras.
- Patch MASTER VCR out to graphics monitor for IFB - check levels with announcers
- Check Audio feed to replay VCR
- Switch VCRs to MANUAL (Hi-Fi) channel so VU meters show actual levels.
- Play cassette music before game or keep the crowd microphone open so viewers know the
sound is working.
DURING EVENT
- Watch meters on VCR.
- Keep balance between announcers and crowd.
- Keep both announcer's levels balanced
- Have music cued for end of half and game for credits.
- Keep crew informed of progress of game.
AFTER EVENT
- Switch VCR to AUTOMATIC level channel
- Play cassette music after game till tape is rewound and playing.
- Turn off batteries on any electret microphones
- Pick up microphones (Booth and Field) and place in cupboard.
--------- GRAPHICS ---------
Graphics help tell the story for the event and provides visual interest. Many times the
director will call for a specific graphic but at other times the operator should 'free
lance' graphics such as player numbers (try to use everyone’s), First-and-10,
upcoming games and replay times etc.
BEFORE GAME DAY
- Enter Visitors starters names
- Update intro. titles, Score boards, Visiting coaches name Last weeks results
- Update and print graphics list.
BEFORE GAME
- Update season-to-date.
- Check weather statistics.
- Make sure visitors name is correct in introduction and score
- Set Score graphics with visitor on top line
- Confirm rosters
- Graphics for other sports this week.
- Check with announcers about special pages they will call for.
- Format and DVD-RW or DVD-ROM disks.
DURING GAME
- Try to get players # & name for introductions
- Do not use same players number repeatedly
- Try to get as many players as possible featured.
- Listen to announcer.
- SCORE graphics frequently - Visiting team on top line.
- Change "1st Half" to "2nd Half"
- Update credits during half time
Freelance graphics:
- REPLAY TIMES - watch Friday or Saturday game.
- WEATHER
- SPORTS LINE
- SCORES of other games
- RECORD-TO-DATE
- STANDINGS
- P.G Top 5
- NEXT GAME - home and away
- UNWANTED VCRS and CAMCORDERS
- COACH
- LOGO
- FIRST & TEN
- OTHER SPORTS THIS WEEK
AFTER GAME
CREDITS over end of game. Student crews like to see their names recognized.
Begin running credits as the annoumncers are wraping up so the viewers will not change
channels befor they run.
Run "Rewinding tape" Graphic at end of tape and during rewind.
SAVE any updated graphics - got to PAGE 00 for name.
Turnoff power supplies. Unplug computer and place in big, brown suite case.
---------- CAMERA ----------
Camera operators must be both artiest and scientist. They must follow directions that
are sometimes unclear and at other times use their best judgment to help the director by
SELLING SHOTS. Camera closet to the play should cover action. Camera farthest from action
should sell COLOR SHOTS. Other camera should get HERO shots at end of play.
SETTING up EVERY shot:
- Look over camera to locate subject
- Zoom out all the way to find subject in viewfinder
- Zoom in all the way in on subject s
- Focus on fine detail in subject - go back and forth quickly to see point of sharpest
focus
- Zoom out to compose using "rule of thirds"
- Keep "nose room" on side player is moving to"
RUNNING THE CAMERA
- Have action move in frame with nose room.
- Zoom in smoothly as action develops. Should be full tight at end of play.
- Keep HERO SHOT at end of play so graphics has a chance to use players name.
- Sell shots
- help the director - anticipate what will happen next.
- Take chances even if you blow a shot once in a while. Let the Director save you.
- Don't HOSE the subject - pan across a subject and then pan back. Slow start and
Finish.
- Don't get too tight on unpredictable action at first. Zoom out slowly to save shot.
- Don't point camera at sky, sun or field lights (night games).
- Don't repeat same color shot. Look over camera and find a variety of interesting shots.
BEFORE THE EVENT
- Help set up cameras.
- Run cable from broadcast booth to right and left camera locations.
- Make sure the tripods are at a proper height.
- Balance the camera!
- Set vertical and horizontal drags
- Confirm the operation of the headphones.
- Confirm and tally lights are working.
- Set the Filter Wheel, video gain and white balance.
- Practice! Practice! Practice!
- Zoom/Pan/Focus - Follow moving objects
- White balance on white paper. Redo as sun sets
DURING THE EVENT
- Listen to the director!
- If a shot is not specifically requested, SELL SHOTS
- When off air, move fast.
- When on air, move smoothly
- When not moving, don't move at all - be ready to move but do not jiggle the camera.
- Don't point camera at sky or sun.
- Keep shots as tight as possible (Within reason!)
- Remember the rule of thirds and NOSE room.
- It is better to take chances and miss a few shots.
AFTER THE EVENT
- Unplug BNC connectors first - not power plug.
- Return cameras & pan head to control room or van.
- Fold and store cables with great care.
---------- VIDEO TAPE ----------
MASTER TAPE If the tape does not work we have no re-broadcast! Master tape needs to
be under two hours so it must be paused at all breaks in the action and RESTARTED
REPLAY is a major production value and should be used on all plays that gain or
lose 5 yards.
BEFORE THEN GAME
- Check that machines are in the S-VHS position.
- Label all tapes with event and date.
- Confirm that S-VHS tapes are in the machines.
- Set counters to 00:00
- Run tape for pre-game intro. and cue for beginning of game..
- Confirm sound to and from the replay VCR
- Practice replay sequence until operation is automatic.
DURING THE GAME
MASTER TAPE
- Use S-VHS tape at SP speed
- PAUSE master tape at time-outs, halftime (except for your band).
- Make sure pauses occur after a COLOR SHOT to avoid JUMP CUTS!
- Keep finger on pause button - do not leave the machine!
- RESTART
Coordinate with the Director
- Keep track of time - Change MASTER machine to SLP at 1:50
REPLAYS
- Coordinate with Director, TD and Graphics
- Use on most plays over 5 yards or good defensive plays
- Replay touchdowns after the extra point.
---------- ANNOUNCERS -------
The quality of the announcing crew sets the tone for the entire broadcast. This is a
craft that is learned only by practice and the ability to review each broadcast. People
forget the visual image but do not forget what they hear.
One off color comment can be destroy a whole show. When several announcers are
working together, all of are equal importance but each should perform a different roll.
One announcer should call the Play-by-play and the other provides the COLOR
and commentary. Do not STEP on each other! When the action becomes exciting, do not shout!
Some times it is best to be quiet and let the action speak for itself. Use vocal
inflection and choice of words to convey the dram of the situation. Remember that the
viewers can see the game. Avoid words like "Oh!", "Gee". Speak
formally not in sloppy slang.
Announcers are to report the action as facts. It is up to the viewers to determine what
is important. Therefor, announcers should not use adjectives which make a value judgment.
I.e. "That was a STUPID call" - "what was he thinking!"
If the team is loosing, do not get down on them. Report positives for both teams.
BEFORE EVENT
- RESEARCH is the key to a smooth on air delivery.
- Have up to date roster of players and statistics.
- Check graphics with computer operator - have list of opening sequence.
- Get list of starting players from PA announcer - give to graphics
- Make sure headphones, IFB, microphones and monitor are working.
- Have introduction on paper but practice out loud with feeling
- Decide on a format as to who will do play by play and color.
- Have additional information on players for color. (Graphics)
- Give results of other sporting events this week. (Graphics)
DURING EVENT
- Remember that Director is producing the show with a novice crew so work with him.
- Be in booth, ready to go, before game and at BEGINNING of SECOND HALF
- Do not answer IFB comments or questions - If needed, work answer into show.
- Uses hand signals to PASS THE MICROPHONE back and forth.
- Delegate responsibility for CALLING THE PLAY AND COLOR
- Remember that keeping quiet is part of announcing.
- Watch monitors for color shots and replays and comment on them.
- After a scoring drive
Write down the highlights while they are fresh
What was important about the drive
Players and yardage.
- Don't STEP on each other
- Don't make up nicknames
- Don't imitate Mike Lang
- Don't be silly or cute
- DON’T SCREAM!
AFTER THE EVENT
- Disconnect head phones and monitor - return to control room.
- Make notes of any problems or concerns for next week.
- Clean up your area.
- Remember the technical crew made this all possible so help with strike.
- Listen to replay and take notes about things that worked and what did not.